
Curate, Validate and Publish an MCP Server from an OpenAPI Spec with Specmatic Genie
By Jaydeep Kulkarni
In this walk-through we’ll show exactly how we took the Postman APIs, curated the set of API end points we want to expose via MCP, validate those end point work the way we want and then wrapped into an MCP server using Specmatic Genie — without writing a single line of code. We’ll demonstrate how an OpenAPI specification can be turned into a fully operational MCP server, complete with a virtual test service, Docker image, and a client integration (Claude Desktop). Below we’ll reproduce the process step-by-step, explain what’s happening under the hood, and share best practices so you can reproduce it reliably for your own agentic workflows.
Why this matters: agentic workflows and tool-wrapping
If you’re designing agentic workflows — automation pipelines that rely on AI agents to perform steps like creating workspaces, provisioning collections, or calling third-party APIs — you want those agents to use stable, discoverable tools. Wrapping APIs (like Postman APIs) as MCP tools provides a clean, standardized interface your agent can call. Doing this manually requires writing server glue, authorization handling, tool metadata, and containerization. Specmatic Genie automates all of that from an OpenAPI specification.
What we start with
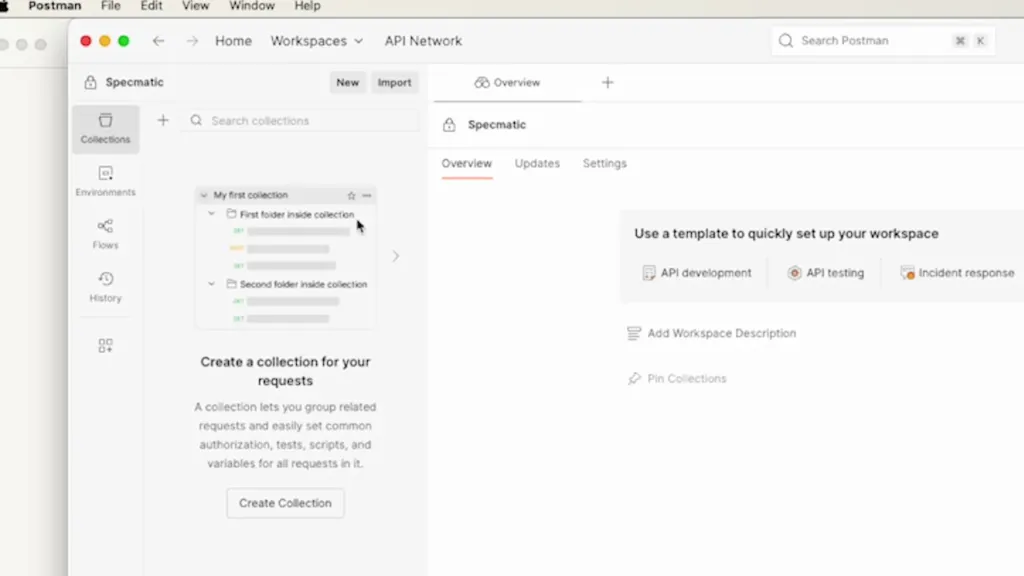
- An OpenAPI specification that describes the APIs you want to expose (Postman APIs in our example: workspaces, collections, billing).
- Specmatic Genie (web UI) to ingest and enrich the OpenAPI spec.
- A target environment to run the resulting MCP server (Docker) and an MCP client to test integration (Claude Desktop).
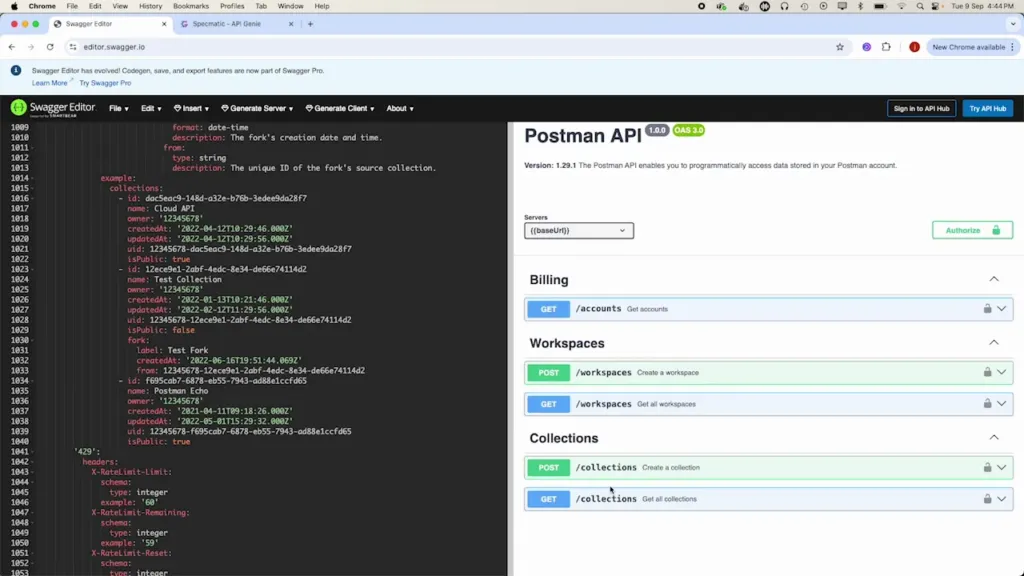
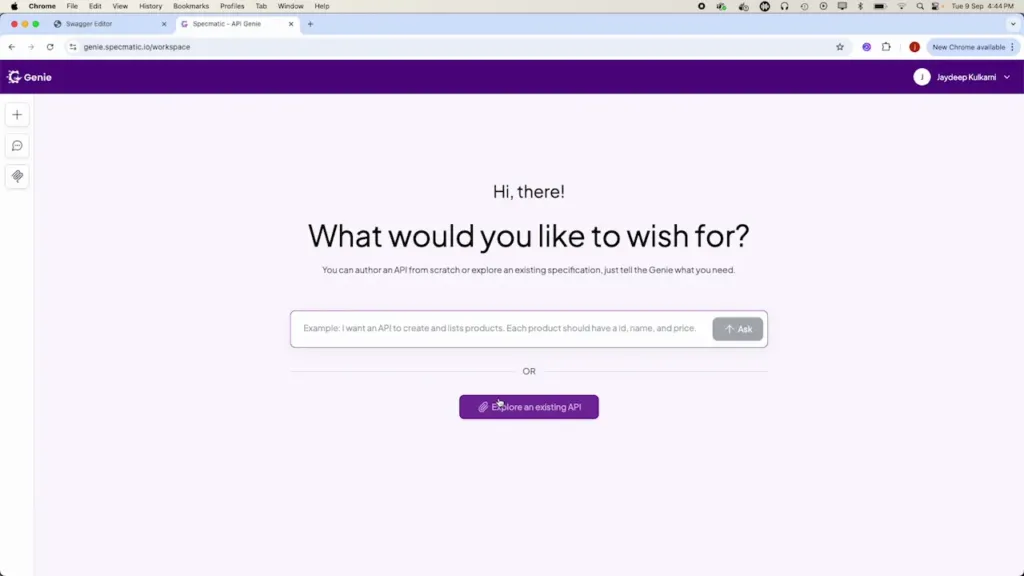
Step 1 — Upload the OpenAPI spec and let Genie enrich it
Upload your OpenAPI spec into Specmatic Genie. Genie performs two important operations immediately:
- Validation — the spec is validated for syntax and basic structure.
- Enrichment — Genie analyzes each endpoint and prepares metadata so endpoints can be mapped to MCP tools automatically (parameters, required fields, descriptions, authentication requirements, etc.).
During enrichment you’ll see progress indicators and a short wait while Genie prepares virtual tooling for each endpoint. Once complete, Genie presents a summary view showing all the endpoints it discovered and a short description for each.
Step 2 — Curate the endpoints you want to expose
Not every API in the spec should be exposed to your agents. For example, billing or account administration endpoints are often sensitive and unnecessary for routine workflows. Genie makes pruning trivial: you can instruct it to remove endpoints using natural language. I removed the accounts/billing endpoint to keep the MCP server focused on workspaces and collections.
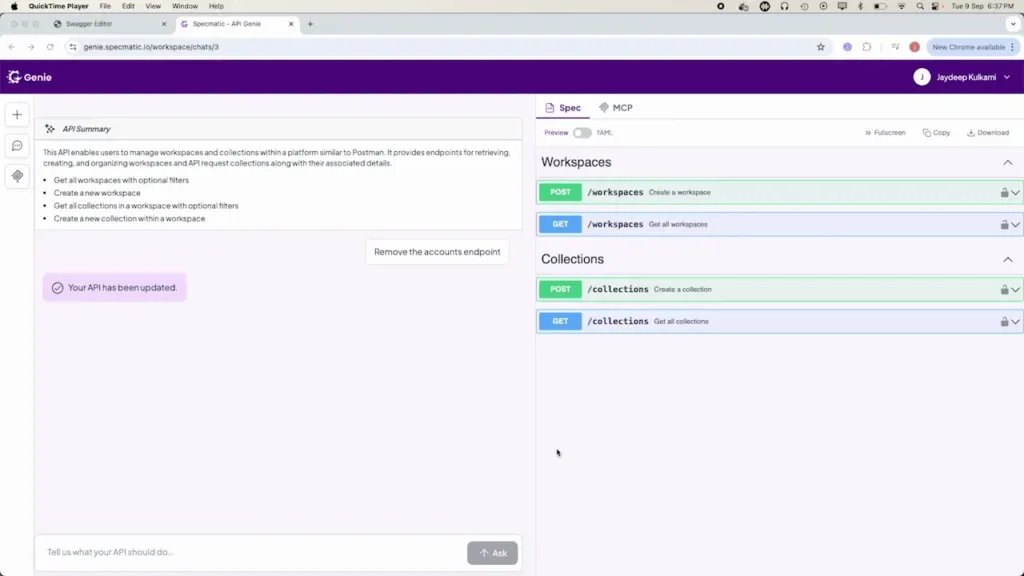
After curation, you have a neat subset of APIs that you intend to wrap as MCP tools. This is your “toolset” that your agent will interact with.
Step 3 — Test endpoints with the virtual service
Before publishing anything, test the endpoints in Genie. One of the most powerful features here is the virtual service Genie spins up automatically from your OpenAPI spec. Every endpoint is mounted as an MCP tool and calls to those tools are handled by this virtual service. This creates a highly realistic simulation of the real API behavior without contacting the live third-party service yet.
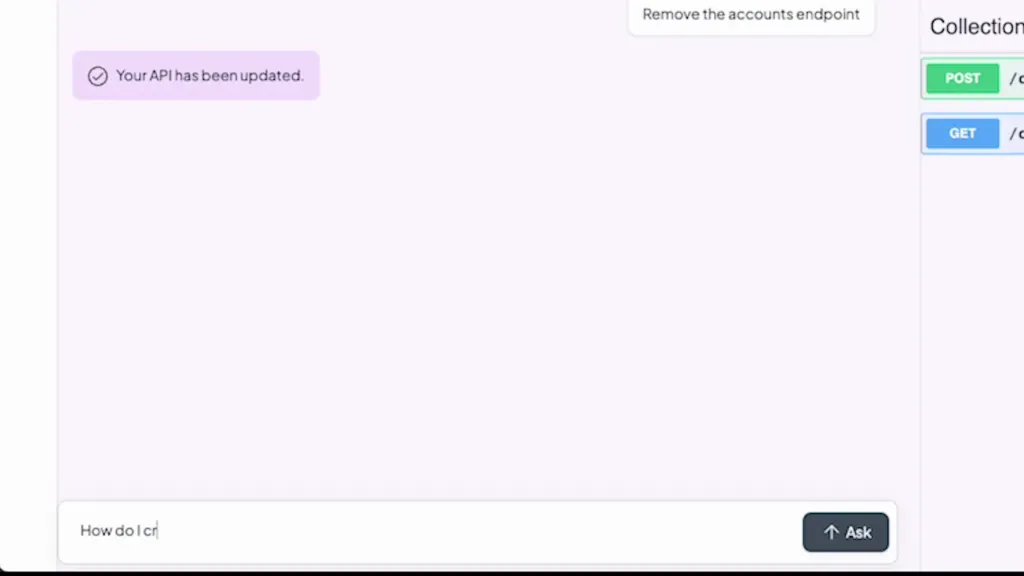
In our demo we did two quick checks:
- Create a workspace. We asked Genie how to create one — it indicated required fields like name, type, description, and about. I told it to create a workspace called Genie with type personal. The virtual service showed the request that would be made and returned a simulated ID.
- Create a collection. We asked Genie for the required parameters and then instructed it to create a collection named payments under the Genie workspace. Logs showed the workspace ID being passed in and a collection response returned.
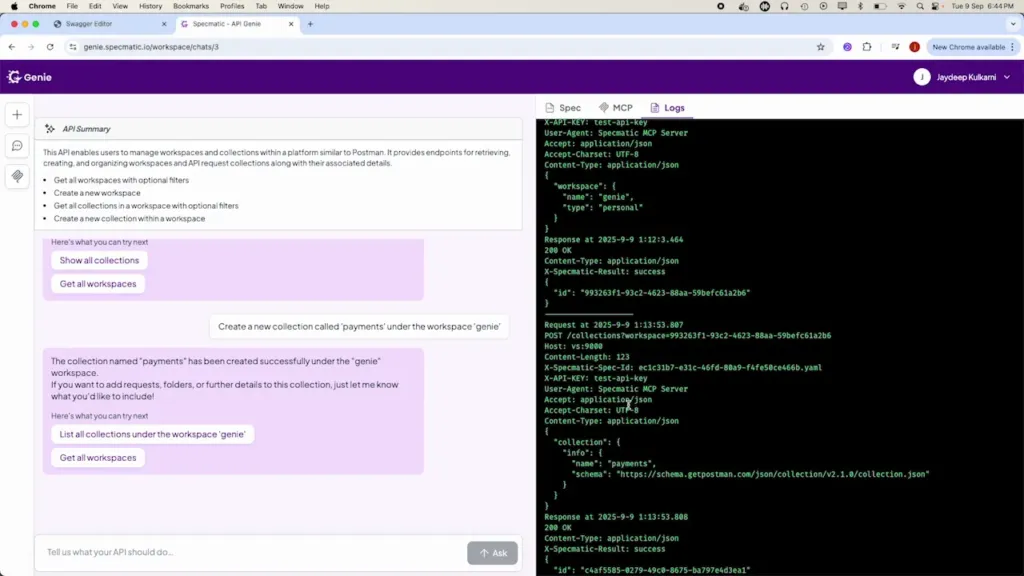
Testing with Genie’s virtual service lets you iterate quickly; you can validate shapes, parameter mapping, and error behavior, and tweak what’s exposed without touching production APIs or credentials.
Step 4 — Publish the MCP server (automated Docker image)
Once you’re satisfied with the endpoints and tests, move to the MCP tab in Genie. Genie will produce a Docker image that packages the MCP server with the curated tools and the necessary runtime to serve them. Several key things are displayed for you:
- The Docker image name and tag that will be published.
- Instructions on how to pull and run the image.
- Any environment variables inferred from the OpenAPI spec (for Postman, Genie detected that an API key is required and flagged it as an environment variable to pass into the container).
- The default endpoint and port used by the MCP server so you can configure clients.
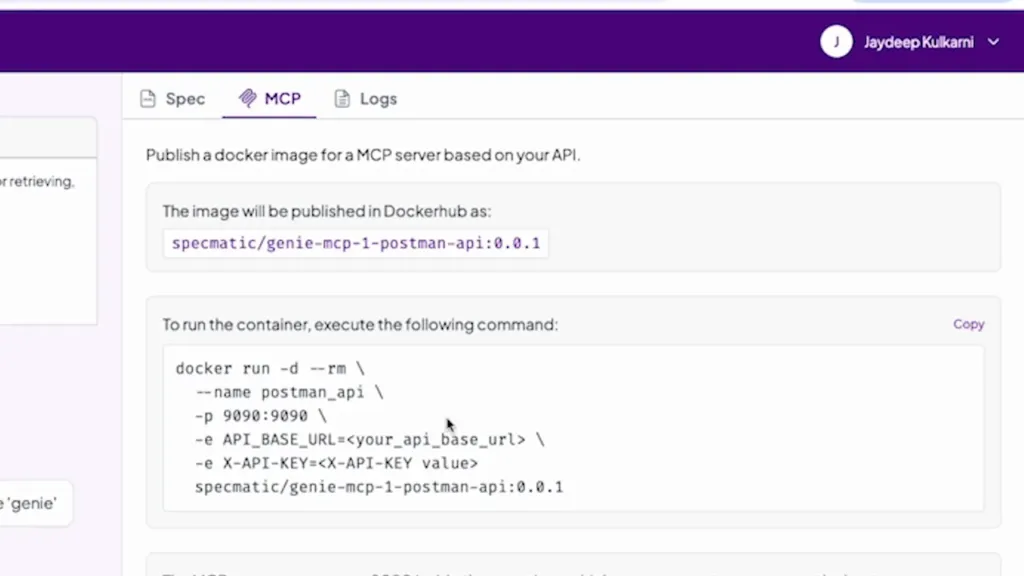
Click publish. Genie handles building and pushing the Docker image to the registry. Monitor the publishing workflow; when complete you’ll have an image tag you can pull and run locally or in your infrastructure.

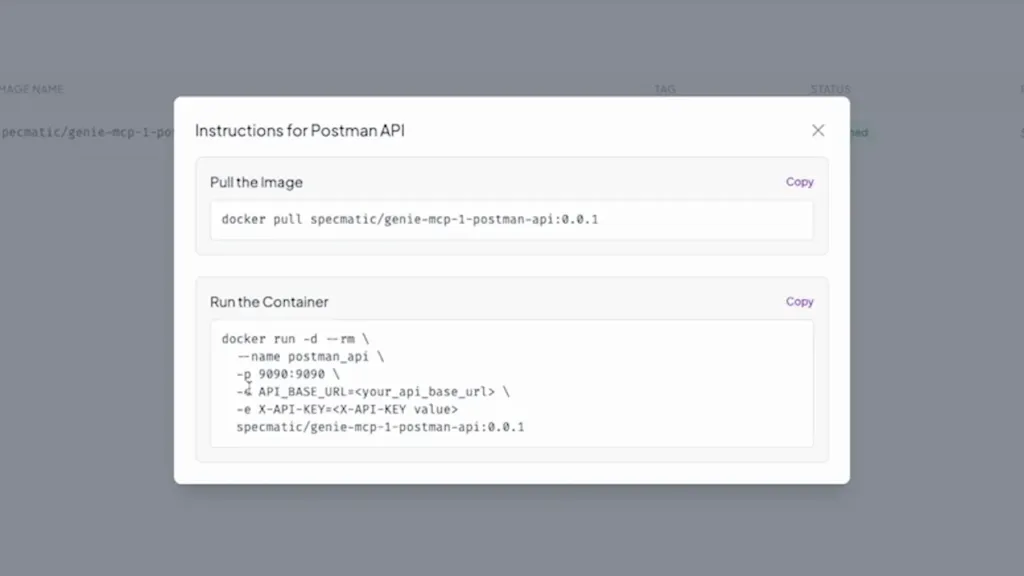
Step 5 — Run your MCP server container
Pull the image and run it with the required environment variables. In our case we supplied:
- POSTMAN_BASE_URL — the base URL for Postman APIs
- POSTMAN_API_KEY — the API key to authenticate real Postman calls
The container exposes an MCP endpoint (default port was shown in Genie). I kept the default host port mapping and launched the container. Once the container was running, the MCP server was live and ready to accept MCP client integrations.
Step 6 — Integrate and test with an MCP client (Claude Desktop)
To prove the end-to-end flow, we integrated the MCP server with Cloud Desktop. Claude Desktop accepts MCP servers via a config file (cloud-desktop-config.json). We added an entry pointing Claude Desktop to my locally running MCP server (e.g., http://localhost:1990/mcp/sc).
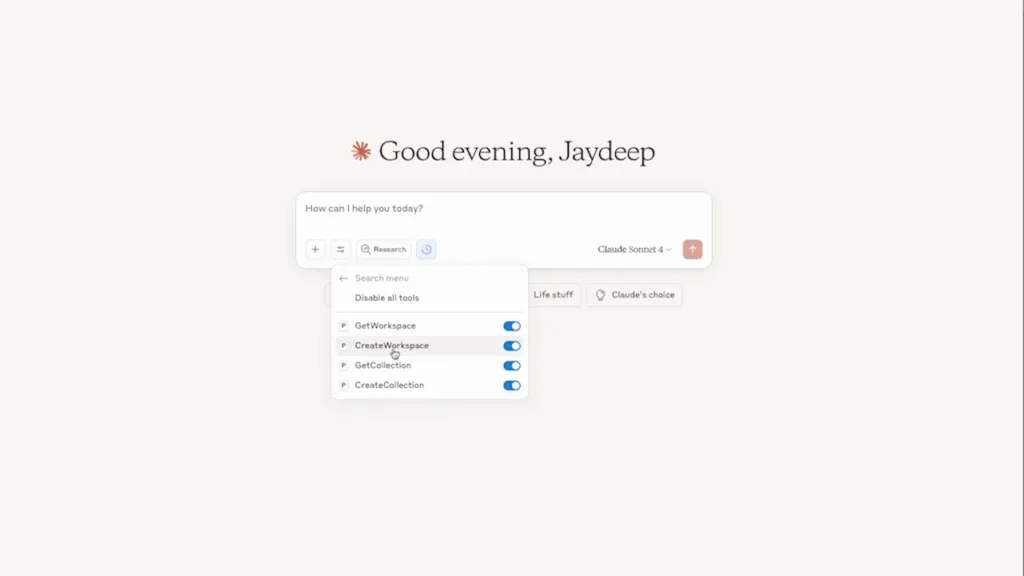
After launching Claude Desktop, the Postman MCP tools appeared in the tool list. We invoked one of the tools via Claude (the AI client) and asked it to create a workspace. The MCP server handled the request, forwarded it to the real Postman APIs using the API key we provided, and a new workspace named Specmatic appeared in our Postman account.
This proves the full lifecycle: OpenAPI -> Genie’s enrichment and virtual testing -> Dockerized MCP server -> Client integration -> Actual API invocation.
Best practices and tips
- Curate aggressively: Only expose endpoints your agents need. Avoid exposing admin or billing endpoints unless required.
- Use the virtual service extensively: Test normal and error conditions before connecting live credentials.
- Store secrets securely: When running the Docker container in production, inject API keys via secure secret managers or environment injection mechanisms rather than hard-coding them into Docker commands.
- Version your MCP images: Use semantic tagging so agents and clients can pin to a stable MCP server version.
- Document tool contracts: Even though Genie enriches the spec, maintain a short README showing which tools are available and sample calls for downstream developers and agents.
Conclusion
Specmatic Genie makes it straightforward to publish an MCP server from an OpenAPI spec with minimal effort. The workflow we followed — upload, enrich, curate, test with the virtual service, publish as Docker, run, and integrate with a client — is repeatable and safe. For agentic workflows that need reliable access to third-party APIs, this approach saves developer time and reduces error-prone boilerplate.
If you maintain APIs or build agent-driven automation, consider adopting a spec-first flow and tools like Genie to streamline the publishing and tooling process. The result is a robust, discoverable MCP toolset your agents can rely on.
FAQ
Q: Do I need to write code to create the MCP server?
A: No. Specmatic Genie generates the MCP server and a Docker image from your OpenAPI spec, so you don’t need to write server glue code. You may still write custom logic later if you want behavior beyond what the spec describes.
Q: Can I exclude endpoints from the generated MCP server?
A: Yes. Genie allows you to curate the spec and remove endpoints using a simple UI and natural-language instructions, so you can control which tools are exposed to agents.
Q: Is there a way to test without connecting to production APIs?
A: Genie creates a virtual service that simulates real API calls based on the OpenAPI spec. Use it to validate requests, responses, and interactions before supplying real credentials.
Q: How do I handle authentication and secrets?
A: Genie infers required auth parameters (e.g., API keys) from the spec and documents them as environment variables. For running containers, inject these secrets via your platform’s secret manager or environment variable injection — avoid committing them to source control.
Q: Can the generated MCP server be used with other clients besides Claude Desktop?
A: Yes. The MCP server is a standard MCP endpoint (HTTP) and can be integrated with any MCP-compatible client or service. Claude Desktop was used only as a convenient demo client.
Q: Does this workflow support AsyncAPI or event-driven specs?
A: The demo focused on OpenAPI. If you have AsyncAPI or other protocol specs, check Genie’s documentation for support and recommended patterns for generating tooling for event-driven endpoints.
Related Posts

By Yogesh Nikam
Testing MCP servers: How Specmatic MCP Auto-Test Catches Schema Drift and Automates Regression
By Yogesh Nikam
Exposed: MCP Servers Are Lying About Their Schemas

By Hari Krishnan
Specmatic MCP as guardrails for Coding Agents: API Spec to Full Stack implementation in minutes
By Hari Krishnan
Authoring & Leveraging Arazzo Spec for OpenAPI & AsyncAPI Workflow Testing

By Hari Krishnan
Visual Workflow Mocking and Testing with Specmatic and Arazzo API Specifications

By Hari Krishnan
Specmatic vs Microcks
By Jaydeep Kulkarni
AWS Lambda Data Pipeline Testing using LocalStack with Specmatic

By John
New features and a BIG Announcement! Specmatic is bringing apidays to India!
By John
Update: See how Specmatic is transforming API testing & development

By Joel Rosario